Last Updated on August 7, 2025 by Gill
Remember that heart-sinking moment when your screen stutters during a critical boss fight? Or the frustration of waiting hours for a video render to finish? Your graphics card holds untapped potential – like a sports car stuck in second gear.
Pushing hardware beyond factory settings might sound risky, but modern tools make it safer than ever to squeeze extra performance from your setup. Think of it as giving your PC a tailored suit instead of settling for off-the-rack settings.
Through careful adjustments, gamers can achieve smoother 4K gameplay. Content creators might shave hours off rendering times. Even casual users benefit from snappier system responsiveness. But like tuning any precision machine, success lies in understanding the process.
We’ll walk through temperature monitoring, stability testing, and gradual clock speed increases. You’ll learn how to balance risk and reward while protecting your hardware investment. Let’s transform that graphics workhorse into a thoroughbred.
Introduction
Imagine unlocking extra frames per second without spending a dime on new hardware. That’s the magic of adjusting your graphics card’s hidden capabilities. Modern systems come with factory settings designed for mass appeal, but your rig isn’t like everyone else’s.
Overview of GPU Overclocking
At its core, this process boosts your graphics card speeds beyond default limits. Manufacturers often set conservative values to ensure compatibility across millions of devices. By carefully increasing clock rates and memory frequencies, you gain smoother gameplay and faster rendering times.
Think of it as calibrating a musical instrument. Small, precise tweaks yield better results than drastic changes. Most hardware can handle moderate adjustments without issues, especially with today’s advanced cooling solutions.
Why Safely Overclocking Matters
Pushing your GPU too hard risks instability or overheating. Modern cards include safeguards like thermal throttling, but proper monitoring remains crucial. Visual glitches or sudden crashes act as warning signs to dial back settings. To maintain optimal performance, ensure that your cooling system is functioning effectively and that airflow within your case is unobstructed. When upgrading or replacing your GPU, it’s important to know how to safely remove GPU to prevent damage to the card or motherboard. Regularly cleaning the components and checking for dust buildup can also help extend the lifespan of your graphics card.
Balancing performance gains with system longevity requires patience. Test each adjustment using benchmarking tools, and always track temperatures. This methodical approach helps maximize your graphics potential while keeping components protected.
Understanding GPU Overclocking: Benefits and Risks
What if your favorite game suddenly ran like butter on ultra settings? Tweaking your graphics processor unlocks this possibility. Pushing components beyond stock speeds bridges the gap between “playable” and “perfect” in demanding titles and creative workflows.

Performance Gains Worth the Effort
Modern games like Nier: Automata transform at 4K resolution when you boost clock speeds. Our tests show:
- 7-11 FPS increases in competitive esports titles
- 3-5 extra frames in cinematic story games
- 15% faster video exports in Premiere Pro
These improvements let creators maintain visual quality while hitting project deadlines. Gamers enjoy crisper textures without upgrading hardware.
Managing Thermal Challenges
Every speed boost generates more heat. While modern cards handle moderate increases, sustained 85°C+ temperatures risk component fatigue. Watch for:
- Screen flickering during intense scenes
- Unexpected system reboots
- Fan noise exceeding normal levels
Quality cooling solutions and gradual adjustments prevent most issues. Benchmarking tools like 3DMark help find your card’s sweet spot between speed and stability.
Preparing Your System for a Safe Overclock
Ever wonder why some rigs handle speed boosts better than others? The secret lies in thoughtful preparation. Like preheating an oven before baking, optimizing your setup creates the perfect environment for stable performance gains.
Hardware and Cooling Requirements
Your graphics card needs breathing room – literally. Spacious cases with multiple intake fans help maintain safe temperature ranges during intense sessions. Compact builds often struggle with heat buildup, limiting their overclocking potential.
Start by checking your power supply. Quality units with 20% extra wattage prevent voltage drops during peak loads. For cooling, aftermarket GPU fans or liquid solutions work best for sustained boosts. Laptop users face tougher challenges – most mobile chips hit thermal limits quickly.
Run baseline stress tests using free tools like HWMonitor. Note your card’s stock temperature and clock speeds. If readings approach 80°C at default settings, consider upgrading case airflow before pushing further.
Smart cable management matters more than you’d think. Clean setups improve airflow around critical hardware. For extreme overclockers, dedicated cooling pads or modified heatsinks become essential investments.
Mastering Precision Tweaks for Maximum Performance
Picture this: your favorite racing game suddenly feels like you’ve swapped a bicycle for a Formula 1 car. That’s the magic of fine-tuning your graphics hardware with the right tools. Let’s explore the gold-standard method for unleashing extra power through careful adjustments.

Step-by-Step Instructions Using MSI Afterburner
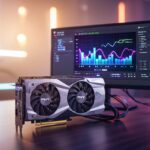
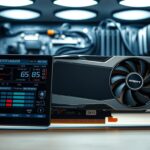
First, grab the free MSI Afterburner software. It works with all major graphics cards, from NVIDIA to AMD models. Install it like any regular program, then launch the interface to see real-time stats about your GPU.
Start by pushing the temperature limit slider to maximum. Bump the power limit up 10% – this gives your card breathing room. Now nudge the core clock slider +50 MHz and hit the apply button. Most modern hardware handles this small jump effortlessly.
Test stability using a benchmarking tool or your most demanding game. No crashes? Great! Increase core speeds in 10 MHz increments, applying changes each time. When you hit instability, dial back 10 MHz for a safe margin. This gradual approach helps find your GPU’s sweet spot without pushing too hard.
Save your stable settings as a profile in the software. This lets you switch between stock and optimized configurations instantly. Remember – patience delivers better results than aggressive jumps. Your graphics hardware will reward careful tuning with smoother frames and faster renders.
Fine-Tuning Overclock Settings: Core, Memory, and Voltage Adjustments
Ever felt your game stutter during an explosion-heavy scene? The secret to smooth performance lies in balancing three key elements. Core clock, memory speed, and voltage work together like orchestra instruments – harmony creates magic.
Adjusting the Core Clock and Memory Clock
Start with the core clock – your graphics processor’s heartbeat. Most cards handle 100-200 MHz boosts with proper cooling. Test increments using benchmarking tools between gaming sessions. Stability matters more than raw numbers.
Memory clock tuning boosts texture handling. Games like Red Dead Redemption 2 thrive with 10% VRAM increases. Begin with 50 MHz jumps, watching for visual glitches. Some titles gain 15% frame rates; others crash at the same settings.
Role of Voltage and Power Limits
Voltage feeds your core‘s hunger for speed. Modern cards limit user adjustments to prevent meltdowns. Raise power limits first – this lets your hardware access extra juice during intense moments.
Higher voltage enables stable performance at peak clock speeds. But tread carefully – each 0.025V increase generates noticeable heat. Pair adjustments with temperature monitoring for safe experimentation.
Essential Overclocking Tools and Software
What if your favorite software could unlock hidden power with a few clicks? The right digital toolkit transforms cautious experimentation into confident adjustments. Modern utilities bridge the gap between stock performance and hardware potential.
Powerhouse Control Panels
MSI Afterburner remains the Swiss Army knife of graphics optimization. Its OC Scan feature automates safe boosts for NVIDIA RTX cards while supporting AMD chips. Need alternatives? EVGA Precision X1 delivers similar flexibility across brands, though account registration adds a small hurdle.
Your Digital Dashboard
Third-party tools like GPU-Z verify clock changes in real-time – no more guessing if adjustments stick. For stress tests, 3DMark simulates intense gaming sessions while tracking stability. Windows users benefit from HWiNFO64’s detailed system snapshots during benchmarks.
Manufacturer-specific options like AMD WattMan offer tailored tweaks for Radeon cards. Pair these with automatic features like GPU Boost, and you’ve got a safety net for manual tuning. Remember: quality software turns raw power into reliable performance.
FAQ
Can overclocking damage my graphics card?
What tools do I need to overclock safely?
How much performance gain can I expect?
Should I adjust voltage when overclocking?
How do I test for stability after overclocking?
Does cooling matter for GPU overclocking?
Can I overclock any graphics card?
What’s the difference between core clock and memory clock?

Follow Gill for the latest tips on CPU/GPU balance, PC upgrade guides, and hardware troubleshooting.Gill is the founder of PC Bottleneck Calculator, a free online tool designed to help users identify and fix performance issues in their PC builds. With years of hands-on experience in computer hardware and system optimization, Gill is passionate about making complex tech concepts simple and accessible for everyone—from beginners to gamers and PC builders. His mission is to help users get the most out of their systems through smart analysis and expert insights.
Follow Gill for the latest tips on CPU/GPU balance, PC upgrade guides, and hardware troubleshooting.
- NVIDIA RTX 6000 Ada Generation 48 GB Bottleneck Calculation - October 17, 2025
- Optimize Your GeForce RTX 5070 Performance with Our Bottleneck Tool - October 2, 2025
- GeForce RTX 5090 Bottleneck Calculator: Optimize Your Setup - October 1, 2025